
Provisioning cloud resources using infrastructure as code is a best practice for development teams no matter how big or small. For a recap on why, you can read the article I wrote about this earlier.
What makes IaC really powerful is when you make it part of a continuous delivery process. Instead of having to use the AWS CLI or console to upload your CloudFormation (or Terraform) change sets manually each time, we can simply push our code to GitHub which takes care of the rest. Here’s how I set that up for my clients and my own projects using GitHub actions.
1. Configure keyless identity federation
To allow GitHub to make AWS requests on our behalf we need to share our AWS secrets with it and we can do so in the “Actions secrets and variables” section of our GitHub repository. While this is semi-secure (storing long-lived credentials is not a best practice), I’m a big advocate of using identity federation instead.
With identity federation we give GitHub just enough time to perform the actions, before the keys expire. Here’s how you set that up.
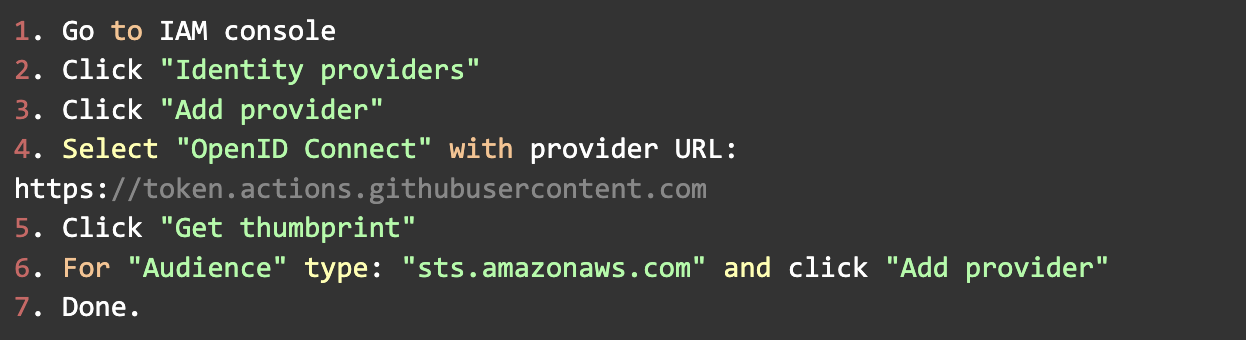
1.1 In AWS, add an identity provider
By creating an identity provider, we tell AWS that GitHub is a trusted entity. It won’t have any permissions yet.
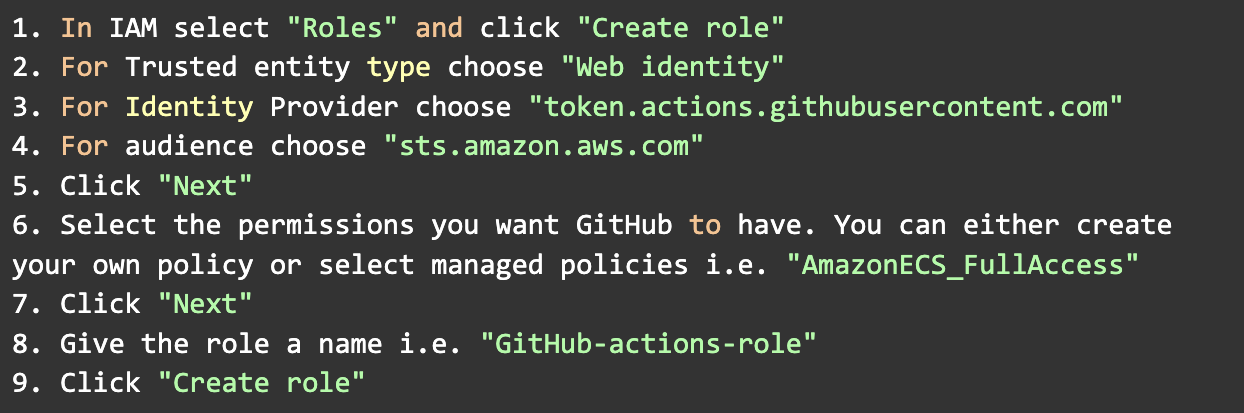
1.2 In AWS, create a role for GitHub to assume
Next we want to specify what GitHub can do. In general you want to follow the principle of least privilege. So we are only giving GitHub access to the resources it actually needs to provision.
Once created, click the role again and copy the role ARN that is shown on the role page. I.e.

1.3. In AWS, modify the trust relationship of the new role
To make sure that only our GitHub account can assume this role, we need to modify the trust policy to include the name of our account. So lookup the role you've just created and when selected click the "trust relationship" tab. While in there, make the policy look like the following and replace the <your-git-account> part with the name of your git account. This policy will give access to all repositories that live in your account. If you want to limit it to only one repository then you can replace the asterix with the name of that repository.
2. Configure your GitHub workflow
A GitHub workflow is a series of GitHub actions that perform actions on our behalf. Luckily for us, AWS provides ready to use GitHub actions we can use in our GitHub workflows.
The actions take care of authentication and the deployment of the CloudFormation scripts.
In your local GitHub repository, create a file called “deploy-to-staging.yml” in “./github/workflows” and paste in the ARN of the previous step. Make sure to also update the region to the AWS region you are using. Lastly you can pass any variables to your CloudFormation scripts using the provided example.
In my case, the CloudFormation script responsible for provisioning my VPC is in ./vpc.yml so that’s the first script that will be executed. You can add as many as you like.
3. That’s it!
Congratulations, you’ve just built an automated CI/CD pipeline for provisioning your AWS resources. If you want to set up multiple cloud environments you can simply repeat the above steps for any GitHub repository and AWS account you are using.
For convenience I’ve written a CloudFormation script you can use instead of having to do the above manually. You can find it here. Happy provisioning!
About the author


Join my mailing list
Stay up to date with everything Skripted.
Sign up for periodic updates on #IaC techniques, interesting AWS services and serverless.

© 2022 / Skripted is a service of Survetti, LLC. Made in Brooklyn, New York.